
Thank you to SewCanShe.com for featuring my tutorial! Please note that this post is from almost a year ago and the giveaway is long over. I've had a lot of comments to enter the giveaway, so i'm sorry if I've confused anyone! But, please enjoy my tutorial!! :)
**Also, it appears some of these photos are suddenly missing. I did not personally delete them from my Flickr photostream, but they are nevertheless gone and I did not keep them on my Macbook. Frustrating. One day soon I may whip up another of these to fill in the gaps, but until then, I'd be happy to help via email if something doesn't make sense without those last few photos.
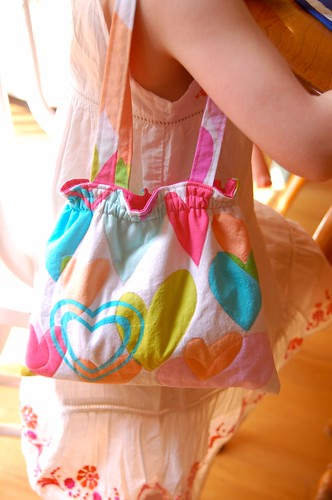
For Natalie's 5th birthday, I made her some clothes for her Groovy Girl doll and a little purse to put them in. She has used this little quilted purse ever since for all her sweet little treasures and a few months ago, a sweet reader emailed me asking if I had plans to post some instructions for that purse. SO, finally, I made one up, took pictures and without further ado, here is your tutorial! Oh, and if you don't want to make this little purse, but you'd like to win one, scroll to the bottom of this post :)
Little Girl's Quilted Purse Tutorial
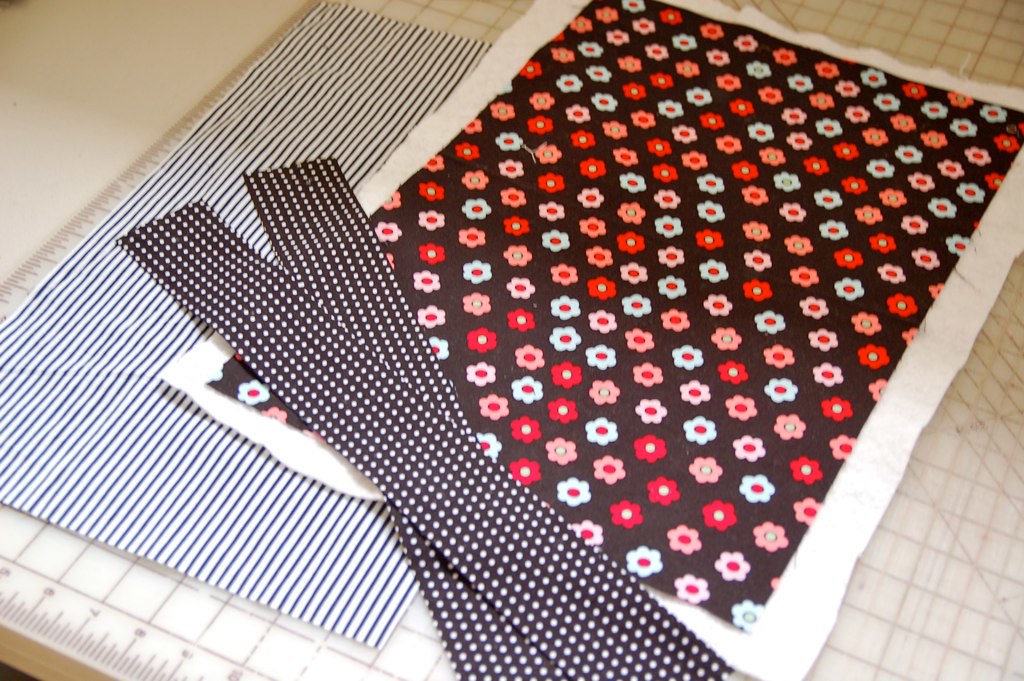
You will need:
13"x20" piece of your main fabric
11"x18" piece of your lining fabric
a rectangle of cotton batting, an inch or so larger on all sides than your main fabric piece
two 2.25"x18" strips for the handles
a 13" piece of elastic (1/4 or 3/8 wide)
Here are my cut pieces:
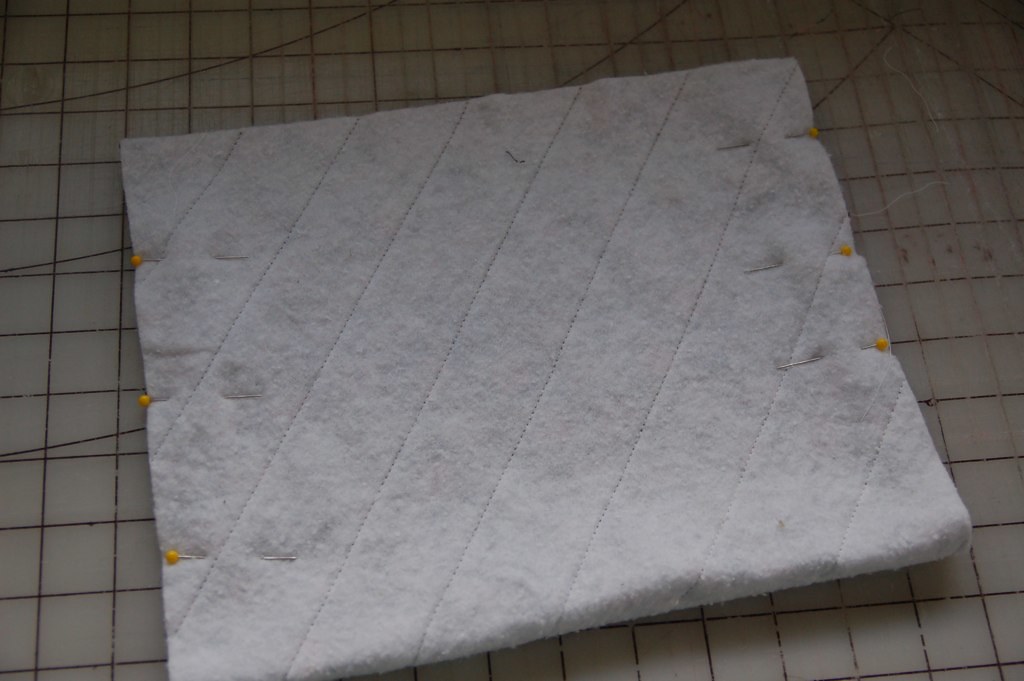
First, we will do the quilting on the main panel. Place your main fabric right side up on top of your cotton batting. You do not need a backing fabric to quilt it if you're using cotton batting, but I don't know if this is the case for polyester batting--it may get caught up in your feed dogs.
Put a few quilting pins in it to keep it all together and mark your lines. On Natalie's heart purse, I quilted around the bigger hearts, but on this one, I'm going to quilt diagonal lines, 1.5" apart. Here is my marked piece:
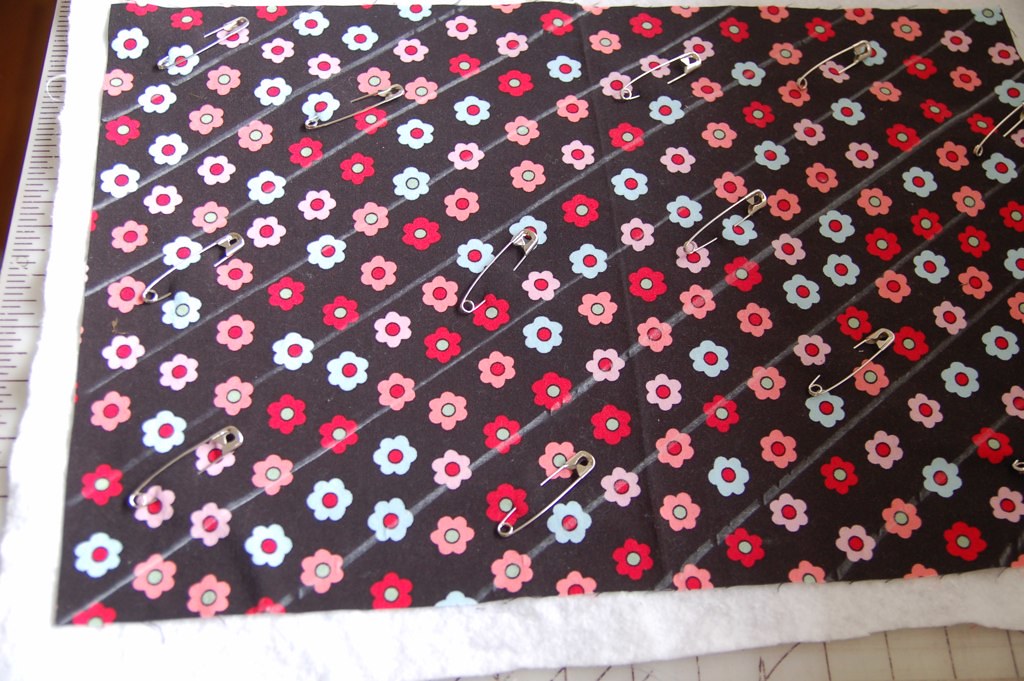
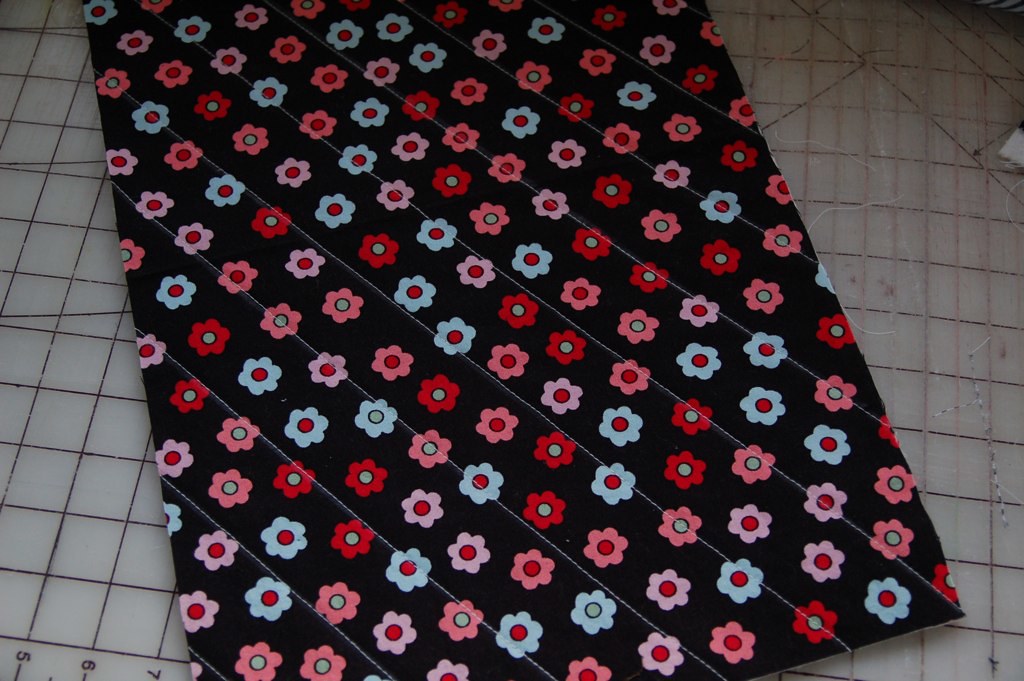
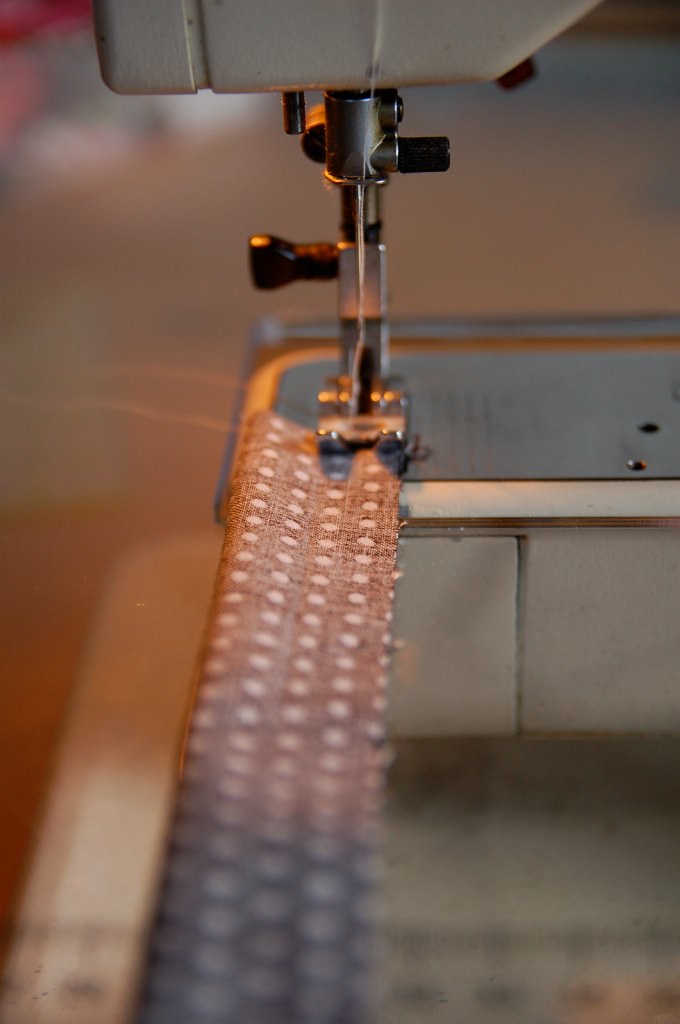
Go ahead and quilt your lines, using a walking foot.
After it's all quilted, you can trim it down to 11"x18", to match the size of your lining piece.
Next, fold your quilted piece in half, hot-dog style (short end to short end). Pin the sides and sew them in a 1/4" seam.
So, you should have a folded bottom, sewn sides, and an open top. Turn it right-side out and set it aside for a minute.
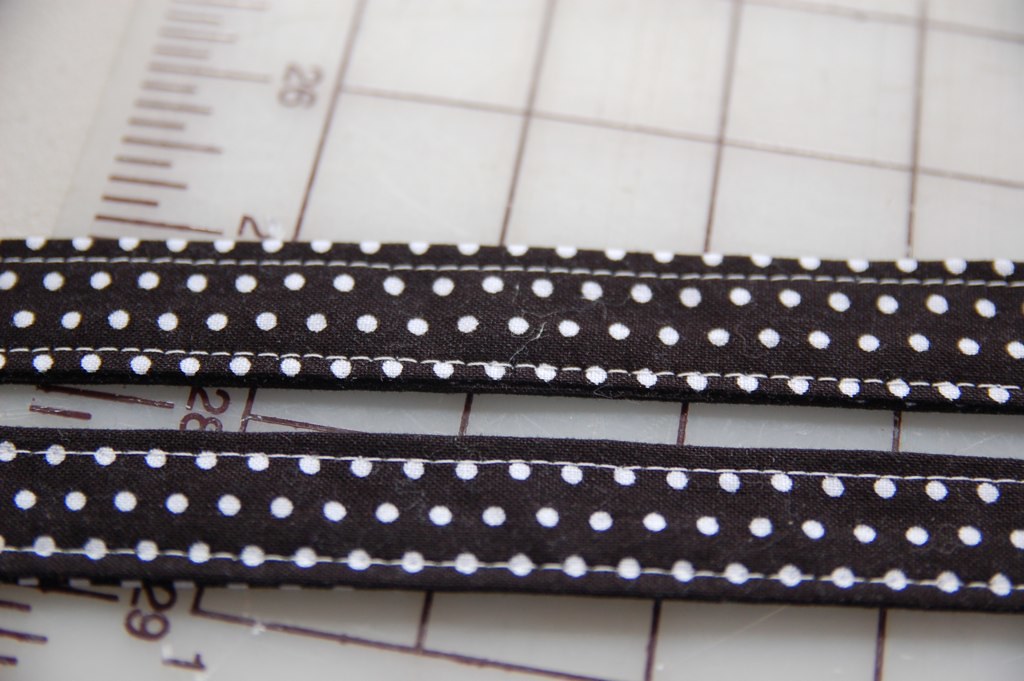
Take your handle pieces and fold them in half length-wise, right sides together and sew a 1/4" seam, leaving the short ends open.
Turn those handles right side out. (I use a Fasturn, but you can also attach a safety pin to one side, then work it through the tube to the other side). Press them flat and topstitch both sides like so:
Pin your handles to either side of your purse, 2.5" from the side seams on each side:
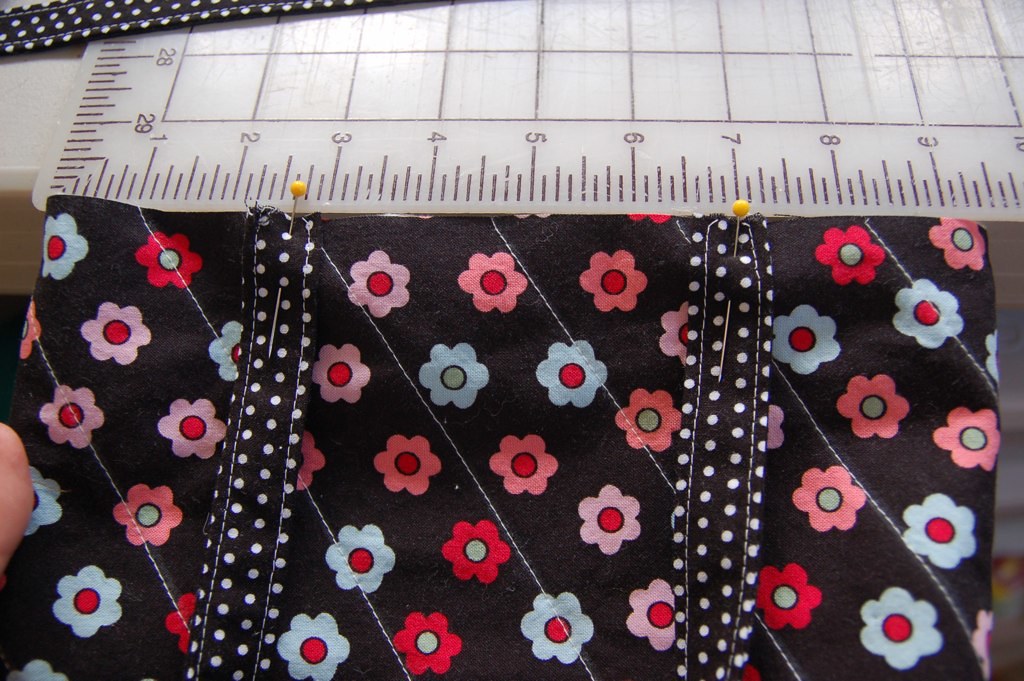
Baste them on there, just inside your seam allowance. Now you should have this:

Okie, dokie, set that aside and grab your lining fabric.
Fold your lining in half just like you did your main panel and make marks on one side, one at 3/4" down from the top and another at 1 1/4" down from the top. Also mark a 3" opening toward the bottom of that same side. So, you'll be sewing the side seam, leaving a 1/2" opening near the top and a 3" opening near the bottom. See where my pins are? I'll leave open between those pins:

Sew the other side all the way up.
Next, slip your lining over your quilted purse. The pieces should be right sides together:

Match up the top edges, lining up the side seams and sew all the way around in a 1/4" seam.

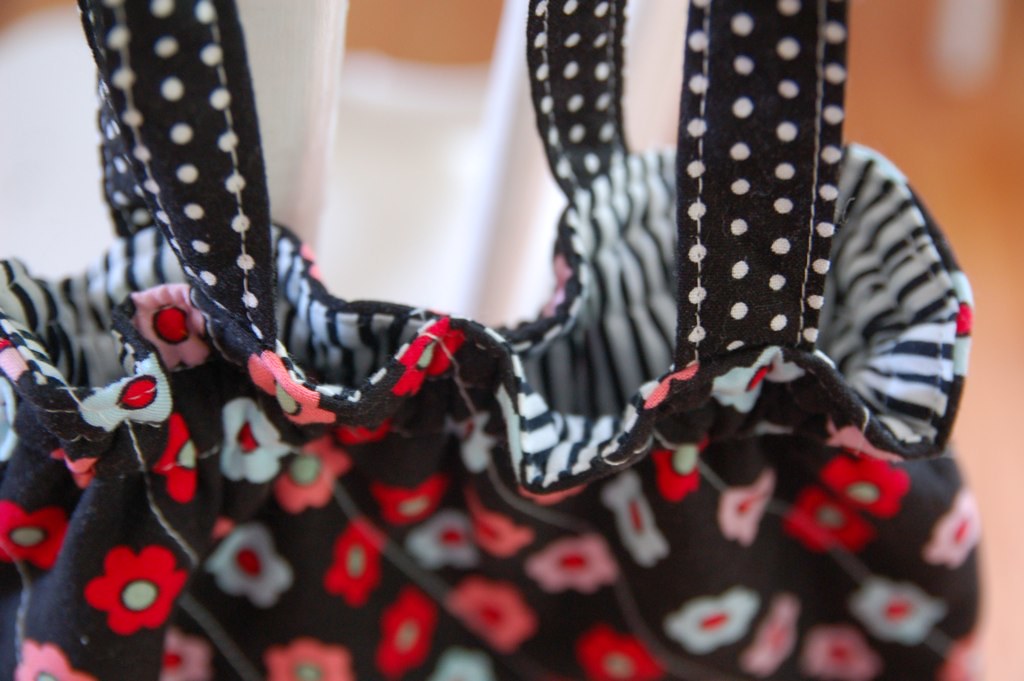
Now you can pull your purse right side out through the 3" opening you left in the lining. Sew up the hole in your lining (by hand or machine), the tuck the lining inside the purse and press that top edge flat.
We are going to make three rows of top stitching. One will be close to the top edge. The next will be 1/2" down from the top and the third will be 1" down from the top. These second and third rows should be on either side of the small gap you left in your side lining seam. It should look like this:

If your gap is a little off from those measurements, that's okay, just adjust the top stitching so your opening is inside the lines.
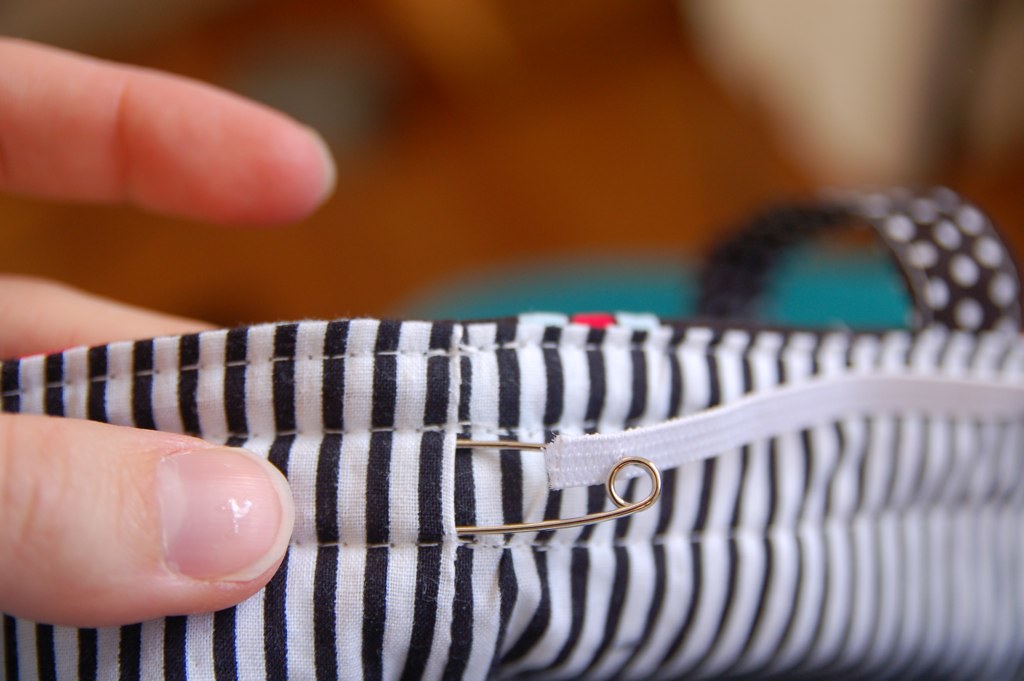
Finally, to make the ruffle, attach a safety pin to one end of your elastic and work it through the casing you created with the topstitching, through the opening in your lining.
Lap the ends and stitch it good.
Done!
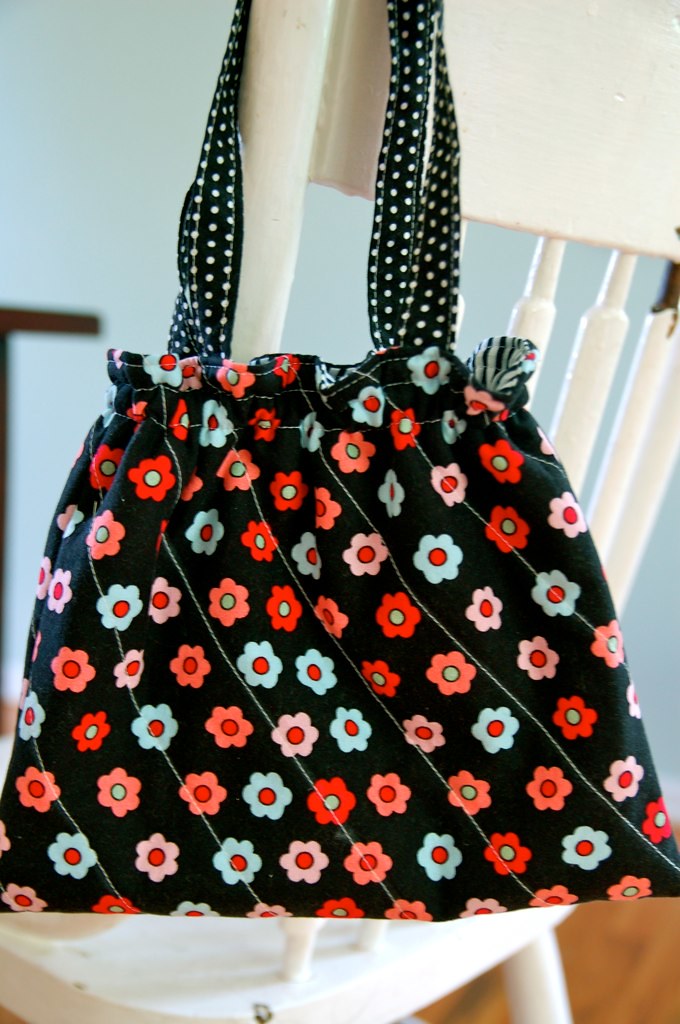
I sure love that little stripe poking out of the top!
If any of this does not make sense, or if I have confused you, please, please, please let me know so I can fix it!!
Now, I thought I was going to make this for Layla, but I remembered too late that I have a cupcake fabric that I think she would like better. Sooooo, I am going to give this one away to one of you!!!!
To enter, all you have to do is leave me a comment on this post! There ya go. Tell your friends :) I'll leave this open for a few days so everyone gets a chance to enter.
Oooohhhh! I'm the first to post! I had better win, seeing as how I'm your favorite sister and all! And besides, don't you think Julia needs that purse for her birthday? I thought so.
ReplyDeleteWow! I am always amazed at your work. I looked at it and thought "oh, I could do that," then I looked again and decided that if my girly girl was going to get a purse like that I would have to win it. Good job, and have fun with the giveaway! Jennifer M.
ReplyDeleteMy 6 year old daughter would love that purse. cute!
ReplyDeleteSO CUTE Nikki! but what do you make the is not cute ;) I don't have to win it will be years before Rebecca really needs one. But I may have to make a boyish one for Jamie he loves bags. lol
ReplyDeleteI guess it's fitting that I should leave a comment on this post since I've been blog stalking you all evening LOL! Last comment before I head to bed. Promise! I am really enjoying your blog though!
ReplyDeleteNot that we need another purse around here....but none of them are this cute, or homemade, or this cute. Did I already say that?
ReplyDeletequestion for you unrelated to the giveaway- have you ever sewn simplicity 3803? do you happen to own it/ know anyone who does??
ReplyDeleteCan't wait to give this a try.I'm going to have two happy little granddaughters!Thanks for the easy to follow insturctions!!!
ReplyDeleteYay, my talented friend! My niece would LOVE that bag. Hope I win! :)
ReplyDeleteThat is a great purse! Thanks for the tutorial.
ReplyDeletePick me!! PICK ME!!! If I win, then I only have to make one more purse (and of course I will have to try your tute!)
ReplyDeleteSo, so cute! Will have to sew one. Thanks for sharing!
ReplyDeleteFound your tutorial via Pinterest. I made one yesterday and it turned out so well. It is just adorable. I made it for our little cousin's birthday, with cat fabric since she has cats. I am going to make another one for my daughter (who is the same age as her cousin) in the same fabric, but with dogs on it, since we have dogs. Thank you so much for the tutorial!
ReplyDeletexo,
Sena
May I feature this tutorial on SewCanShe.com? Please drop me a line to tell me it's okay. caroline@sewcanshe.com
ReplyDeleteThanks!
My friend and I are going to make your purse. Thank you for the tutorial.
ReplyDeleteMy friend and I are going to make you purse. Thank you for the tutorial. Sooo cue!
ReplyDeletehow cute, I've been looking for a small bag. I love the fabric you used
ReplyDeletehow cute, I've been looking for a small bag. I love the fabric you used
ReplyDeleteI love that purse and would use it for myself since I always use small handbags. Will probably make one for myself and maybe my great granddaughter!
ReplyDeleteI love it, and so would my granddaughter. Great tutorial!
ReplyDeleteThis would be so cute to carry my asthma medications in. Thank you for the opportunity to be in your drawing!
ReplyDeleteOh my goodness gracious, I LOVE that fabric! So darling :)!!!! Just perfect- Even if I don't win, I will be making this for sure :) Thanks for a marvelous tute! Have a great weekend!
ReplyDeleteI gave my granddaughter her first sewing machine today! We will make this bag together-twice for her two adorable little girls. Thank you for the contest.
ReplyDeleteI would love to make one of these darling purses but I am buried in UFO quilts. My sweet little Great Grand Daughter could have one right away if I am selected. Pretty Please.
ReplyDeleteGrammy Pat
ADORABLE!! LOVE THIS SWEET BAG. MY DAUGHTER WOULD ABSOLUTLEY ADORE IT! GREAT TUTORIAL AS WELL! ;)
ReplyDeleteAJA.FREEBURN@YAHOO.COM
So cute! My little G-daughter would love this, and such cute fabrics too!
ReplyDeleteOops! Saw the message at the top after I posted. I was so into reading about how to make the purse.
ReplyDeleteIt is very cute little purse ...Would love to win ti ...but if not I;ll just have to make one... thanks for the tute.
ReplyDeleteI have two daughters, my youngest loves purses and would so love this. Thanks for sharing.
ReplyDeleteGreat tutorial! I made one today for my little one. I wasn't paying attention and put the straps on wrong, but it is still super cute. My daughter loves it! I used flannel. It is soft and so adorable.
ReplyDeleteGreat little bag! I made one for my Ganddaughter and she loved it. I am back to make another but 5 of the pictures are "unavailable". I think I can figure it out, just wanted to let you know.
ReplyDeleteGreat Tutorial! I found on Pinterest! I wanted to let you know about some missing photos that would be super helpful if they could show up! The elastic is the tricky part! Thanks so much!
ReplyDeleteGoing to make this for my granddaughters!
ReplyDeleteI'm in agreement! I am making this cute little bag, but the missing photos are a bummer.
ReplyDeleteI just made one of these for my great niece for her birthday. It came out so, so cute and was super easy! Thank you so much for sharing.
ReplyDeleteI just made one of these for my niece for her birthday. It came out so, so cute and was super easy. Thank you so much for sharing.
ReplyDelete